New to yoga and unsure where to begin? These basic yoga poses for beginners are perfect for those just starting out.
Yoga, an ancient practice involving specific poses (asanas) and breathwork (pranayama), has gained immense popularity in recent years. From social media to local studios, yoga is everywhere—and for good reason.
Research suggests that practicing yoga offers numerous health benefits, promoting both physical and mental well-being. It fosters a sense of calmness, enhances body awareness, and reduces stress and anxiety.
Moreover, yoga can improve core strength, posture, and digestion, while also alleviating back pain.
If you’ve been contemplating starting yoga, now is the time. It can positively impact every aspect of your health. To help you begin your journey, familiarize yourself with these common yoga poses—ones you’ll likely encounter in many classes.
Consider this your cheat sheet for yoga.

You’ll also like:
- These Hip Opener Yoga Poses Stretch and Strengthen Tight Hips
- The 8 Best Poses Every Man Should Be Doing
1. Corpse Pose (Savasana)
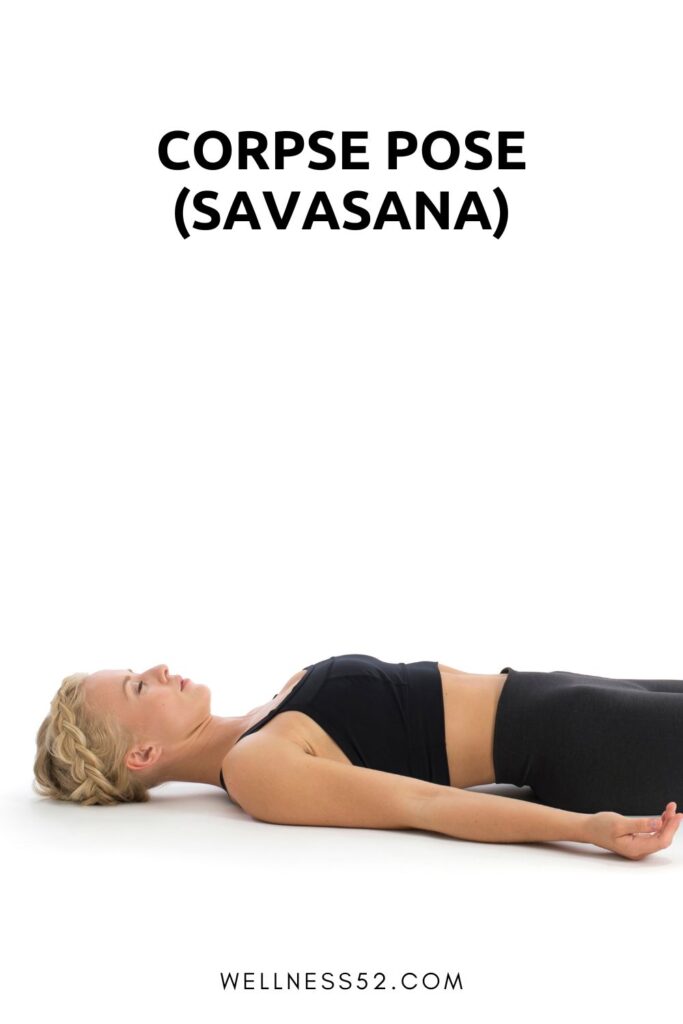
Savasana is often done at the end of a yoga class/ practice to relax and calm the mind and body. It’s a very easy and simple exercise to do. This pose helps to calm the mind, relax the body, and relieve stress.
How to do it:
- Begin by lying on the mat and relax your arms along the sides with the palms facing up and the legs out in front of the body.
- Close your eyes and focus on relaxing for 5 minutes. Breathe naturally. You should feel your belly button moving up and down.
- Come out of the pose slowly, rolling to one side before coming up to a seated position.
2. Mountain Pose (Tadasana)
Tadasana is the beginning of all the standing poses. It’s one foundational pose that’s also used as a transition to other poses. However, it can also be practiced on its own as a breathing exercise and for posture alignment.
How to do it:
- Start by standing with the feet hip-width distance apart Hug the core in and tug your tailbone. Bring the arms out to the side of your body.
- Stand tall like a mountain. Hold for a few breaths and then exhale to come out of the pose or to flow into the next pose
3. Easy Pose (Sukhasana)
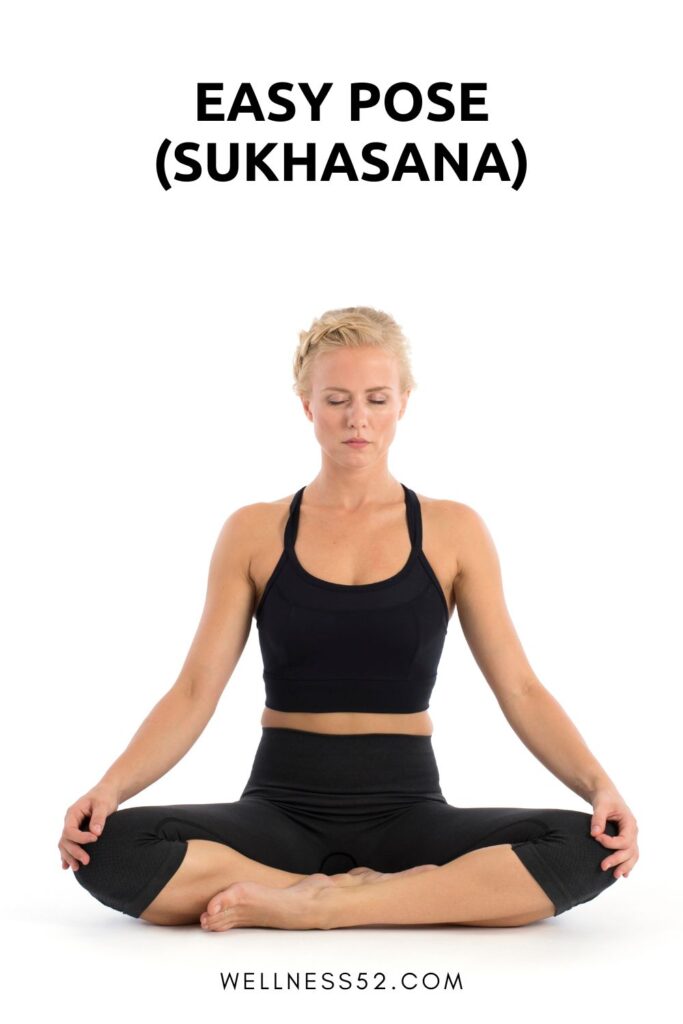
Sukhasana is great for enhancing your hips and back flexibility.
It’s a great exercise for conditioning your abdomen and strengthening the back and spinal muscles. It also opens the hips, groin, and outer thigh muscles (abductors).
How to do it:
- Begin by sitting up straight with your legs crossed and your shoulders pulled back and relax. Hug your abdominals in and bring the top of the head parallel to the ceiling.
- Breathe calmly and evenly.
- Hold this position for any length for a few minutes. If you practice this pose regularly, be sure to alternate the cross of the legs.
- Pro tips: If your knees don’t reach the ground, yoga blocks or pillows can be placed beneath them. Try to keep your hips down, and let your spine grow tall as shown in the image.
4. Upward Facing Hand Pose (Urdhva Hastasana)
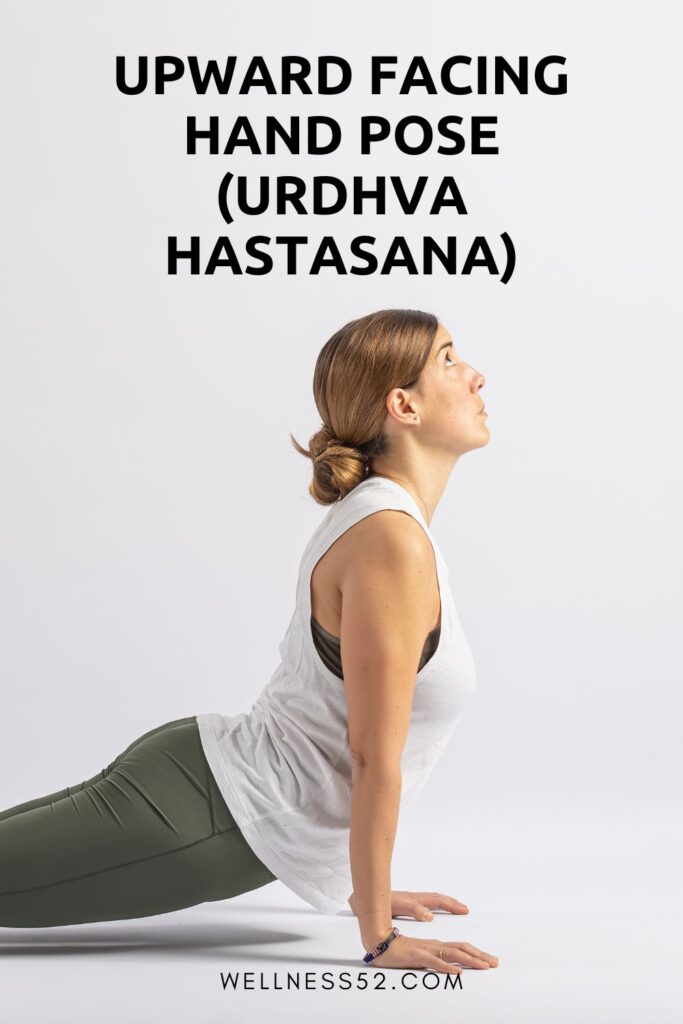
Upward hand facing pose is also known as Upward Salute, Upward Tree Pose, or Palm Tree Pose. It is great for stretching the whole body and letting energy flows through. It also helps with feeling more awake and making it easier to breathe by expanding the ribs and lungs.
How to do it:
- Begin by standing tall with the feet hip shoulder-width apart in Mountain Pose. On an inhale, bring the hands up to the sky, taking a slight backbend
- Hold for as long as feels good, or simply flow into the neck pose on the exhale. Exhale to come out of the pose
5. Cat Pose (Marjariasana)/ Cow Pose (Bitilasana)
These two poses are often done as linked movements, flowing from one to the other.
Cat and Cow are often practiced together, in the beginning, to gently stretch your lower back and spine. This practice is amazing for the back and your abdomen. These deep stretches can help with alleviating cramps and improving posture.
How to do it:
- Begin on the hands and knees with the hands under the shoulders and the knees under the hips. On the inhale, press into the hands and arch the back, bringing the head and hips up to the sky.
- This is a cow pose. On the exhale, round the back, tucking the head
- Repeat for at least five breaths
6. Seated Forward Fold (Paschimottanasana)
Paschimottanasana is a classic pose that stretches the back and hamstring muscles. It’s a great exercise to lengthen the spine.
How to do it:
- Start by standing tall with the feet hip-width distance apart in Mountain Pose (Tadasana)
- On an inhale, bring the arms up to the sky in the upward-facing hand Pose (Urdhva Hastasana)
- Exhale, folding forwards and reaching the hands towards the feet. If the feet cannot be reached, just reach as far as the hands can go
- Hold for a few breaths. Inhale to rise back up
7. Cobra Pose (Bhujangasana)
Bhujangasana is great for strengthening the shoulders and back while stretching the chest. It also improves spinal flexibility.
How to do it:
- Start on the belly with the hands beneath the shoulders
- Using the hands and the core, inhale and lift the head, neck, and chest from the ground (only going as far up as possible using the back muscles)
- Hold for a few breaths. Exhale back down and out of the pose
8. Garland Pose (Malasana)
Malansana is a deep squat yoga pose that opens the hips, groin, thighs, and ankles. This pose helps increase blood circulation in the pelvis.
How to do it:
- Begin standing with the feet a little bit more than hip-width distance apart
- On the exhale, squat down, keeping the toes and knees pointed out to the side.
- Bring the elbows to the insides of the knees, and keep the hips pressed down and back
- Hold for a few breaths. Inhale back to standing to come out of the pose
9. Downward Facing Dog (Adho Mukha Svanasana)
Downward facing dog elongates the spine and strengthens the back and upper body muscles.
How to do it:
- Start on all fours with your palms and your knees on the floor. Keep your arms straight and neck flat. Breathe out. Tuck your toes under and lift up your hips and glutes. Slowly straighten your legs. Stretch more so that your arms and legs are straight.
- Adjust your position so that both sides of your body stretch evenly. Slowly bend your knees and sit gently down on your heels, bend forward and relax.
10. Four-Limbed Staff Pose (Chaturanga Dandasana)
Chaturanga Dandasana is a strong, invigorating pose that will fire up your entire body when practiced correctly.
It is commonly used as a transitional pose in many Vinyasa flow classes, so knowing how to do this posture will be extremely helpful.
How to do it:
- Begin in Plank Pose, the top of a push-up, with your hands directly under the shoulders. With an exhale, push forward slightly from your toes and lower yourself down halfway.
- As you lower, maintain your alignment in the spine and pelvis. Keep your core and legs super active, by drawing the belly in and up, and pulling up on the kneecaps.
- Hug your elbows in close to the sides of your body, and do not bend them past a 90-degree angle.
- Release the posture by gently lowering yourself all the way to your mat, or flowing through.
11. Chair Pose (Utkatasana)
This pose targets the muscles of the lower body, toning and strengthening the legs and glutes. It also opens up the chest and shoulders and stimulates the internal organs.
What’s more, it is one of the best yoga poses for practicing your tapas, or self-discipline, as your thighs begin to burn!
How to do it:
- Start by standing with your feet together. As you exhale, bend your knees and sink your hips back as if sitting into a chair behind you.
- Reach your arms up and forward on a diagonal as you draw your shoulders down and away from your ears. Keep space between your collarbones and feel your chest open.
- Aim to maintain the natural curves of the spine, not tucking the pelvis too much, or letting it splay backward.
- Hold for a few breaths and exhale to release the posture.
12. Locust Pose (Salambhasana)
Locust pose is another posture that works the entire body. It creates length in the spine and front body while strengthening the back, core, glutes, and thighs. If you struggle with poor posture, anxiety, or lack of focus, this pose will be great for you!
How to do it:
- Start by lying on your belly with your arms and legs extended straight out in front and behind you. With your inhale, lift your arms, head, upper torso, and legs all at once.
- Gaze down and forward, keeping the back of the neck long. Squeeze your legs together, drawing your big toes to touch.
- For a challenge, sweep your arms behind you, clasping your hands above your low back and drawing the heart forward.
- Hold the posture for a few breaths, then release gently on an exhale.
13. Boat Pose (Navasana)
To target your core, the Boat pose is extremely effective! It also strengthens and lengthens the spine, and stimulates the internal organs to aid in digestion.
How to do it:
- Begin in a seated position with your knees bent and feet planted in front of you. Sit up tall, reaching the crown of the head up towards the sky to lengthen your spine.
- Extend your arms directly in front of you and lift your feet off the ground so your legs are bent at a 90-degree angle. Rock forward slightly so you are balanced on your sitting bones.
- Draw your low belly in and up to avoid rounding through the lower back.
- Once you feel stable, try extending your legs to take this pose to the next level.
- Hold for a few breaths, maintaining an active core. Gently release your feet to the floor with an exhale to come out of the posture.
14. Warrior I (Virabhadrasana I)
The Warrior poses target the entire body, especially building strength in the lower body. Warrior I opens the chest and lengthens the hip of the extended leg. It can improve circulation and help you feel more focused and grounded.
How to do it:
- From a high runner’s lunge with your right leg forward, spin your back left heel down so your toes are at a 45-degree angle to the short edge of your mat.
- Bend into your front leg, with your knee pointing in the same direction as your toes (straight forward). Be mindful that the knee does not bend past the ankle.
- Lift both of your arms towards the sky, allowing your gaze to follow.
- To exit the posture, bring your hands to the floor as you exhale, then step your front foot back to Downward-Facing Dog (Adho Mukha Svanasana). Repeat Warrior I with the left leg forward.
- *If you have a hip injury, please avoid practicing this posture.
15. Warrior II (Virabhadrasana II)
Just like Warrior I, this posture engages the entire body. It is a very grounding posture and can help improve your concentration. Warrior II also strengthens your arms, and back, and opens the hips and chest.
How to do it:
- From a high runner’s lunge with your right leg in front, spin your back heel down so the toes of your left foot are at a 45-degree angle to the short edge of your mat.
- Bend into your front leg, creating the same foundation as in Warrior I.
- Extend your arms at shoulder height so they are parallel to the long edge of your mat. Set your gaze over the middle finger of your front hand. Activate the muscles of your arms by pressing them down against energetic resistance.
- To exit this posture, cartwheel your hands to the top of your mat and step your right foot back to Downward-Facing Dog. Repeat Warrior II with the left leg forward.
- *If you have a hip injury, please avoid practicing this posture.
16. Extended Side Angle Pose (Utthita Parsvakonasana)
This posture strengthens the lower half of your body and offers a deep side stretch of the upper body. Also, this posture relieves tension in the back and shoulders and opens the hips and chest.
How to do it:
- From a high runner’s lunge with your right foot forward, spin your back heel down so the toes of your left foot are at a 45-degree angle to the short edge of your mat. Bend into your front leg, creating the same foundation as in Warrior I and II.
- Make your way into Warrior II. Then, on an exhale, bring the front elbow to the front thigh. Extend the other arm overhead, reaching toward the front of your mat.
- Press your front elbow firmly into your thigh to lift the torso and open the chest with a slight twist. Turn your top temple toward the sky to keep your head aligned with your spine.
- Come out of this posture by planting your hands on either side of your right foot, then stepping back into Downward Facing Dog. Repeat the Extended Side Angle with the left foot forward.
17. Shoulder Stand (Salamba Sarvangasana)
Inversions like Shoulder Stand stimulate metabolism and benefit both the immune and lymphatic systems. This posture will also strengthen your core, glutes, and legs. Practicing this posture at nighttime specifically helps relieve insomnia.
Take care in this posture to be sure there is no weight directly on the neck. As a precaution, you can cushion your neck and shoulders with a folded blanket.
How to do it:
- Begin lying on your back with your arms at your sides. Bend your knees into your chest then extend them towards the sky.
- Firmly ground down through your arms and as you press them into the floor, lift your hips to create a straight line from your torso to your toes.
- For support, bring your hands to your low back, with your fingertips pointing up toward your toes. Keep your elbows tucked in. Walk your hands up higher up on your back as you straighten your torso even more.
- Hold the posture for a few breaths and slowly release with an exhale.
- Beginner’s tip: get the same benefits of this inversion by practicing Legs Up the Wall (Viparita Karani) instead. Simply lie next to a wall, keeping your entire upper body on the ground, and extend your legs up the length of the wall with your body in the shape of an L.
18. Tree Pose (Vrksasana)
This posture may not look so challenging, combines strength, balance, and flexibility. This pose builds up strength in the core and the stabilizing muscles of the standing leg while stretching the groin and glutes. Practicing tree pose can also help you feel grounded, connected, and focused.
How to do it:
- Begin standing with the feet together in a mountain pose. Root down into one foot as the other foot lifts. Place the sole of the lifted foot flat against the inner thigh or calf of the standing leg (never on the knee!).
- Bring your hands with your palms together in front of your chest in a prayer position to help create balance.
- When you gain stability, inhale and reach your arms up to the sky. Keep your gaze focused on an unmoving point.
- Maintain steady breath until you are ready to release the pose, placing the foot back down with an exhale.
19. Upward Facing Bow/ Wheel Pose (Chakrasana)
Heart-opening yoga poses are energizing postures. Wheel pose strengthens the arms, shoulders, and legs while lengthening the front body and hips.
As with other backbends, it opens the shoulders and chest in a deep way and improves the mobility of the spine. This yogic posture can also alleviate symptoms of asthma and help fix slouched posture.
How to do it:
- Start by lying on your back with your knees bent and the soles of your feet on the mat. Your feet should be hip-width apart.
- Place your palms on either side of your head, with your fingertips pointing toward your toes. Keep your elbows hugging in and lift your hips. Engage your glutes and hamstrings to support your lower back.
- Ground yourself equally into each hand and foot. Draw your shoulder blades together and open them across your chest.
- Stay for several breaths. When you are ready to release the posture, gently lower your hips to your mat with an exhale.
- Beginner’s tip: if you are new to a yoga practice, try practicing bridge pose instead (find the pose below).
20. Extended Hand to Toe Pose (Utthita Hasta Padangusthasana)
This pose might be a bit ambitious if you are just beginning your yoga practice — but give it some time and practice, and you will notice improved balance, flexibility, and focus.
This posture strengthens all of the muscles that stabilize your standing leg, from your ankle to your hip. It is a deep stretch for your hamstring and opens the arm and shoulders as well.
How to do it:
- Begin by standing in a mountain pose. Set your gaze on a non-moving point and root down into your left foot.
- On your inhale, raise your right knee up towards your chest. Grasp your right big toe with the first two fingers of your right hand. As you exhale, rotate your bent knee and right arm out to the side.
- Straighten the right leg and arm on your next inhale. Keep your gaze and breath steady.
- To come out of the posture, bring the leg back in front of the body, and gently release it to your mat.
21. Plank Pose (Phalakasana)
Plank is without a doubt one of the best yoga poses for beginners to know. Practicing this posture will warm, energize, and tone your entire body. The plank pose strengthens your wrists, arms, shoulders, core, and legs. Over time, it can also help reduce back pain and improve posture.
How to do it:
- Come into a push-up position with your shoulders directly over your wrists. Spread your fingers wide and grip your mat with your fingertips to engage your arm muscles.
- Widen the space between your shoulder blades and reach the crown of the head forward to lengthen your spine. Pull your belly in and aim to keep the natural curves of your spine.
- Engage your leg muscles by pulling up on your kneecaps and pressing back through your heels, as if there is an imaginary wall behind you.
- Hold your plank for several breaths and release on an exhale, either lowering yourself to your stomach or flowing through to the posture in a sequence.
22. Bridge Pose (Setu Bhandasana)
Bridge pose is another on the list of basic yoga poses that is also great for your body in many ways!
It tones and strengthens your glutes and hamstrings, opens up your chest and shoulders, and increases the mobility of the spine. This asana also aids in digestion by stimulating the internal organs and can help alleviate stress and anxiety.
How to do it:
- Begin by lying on your back with your knees bent and soles of the feet on your mat, hip-width distance apart. Place your arms at your sides.
- Ground down through your feet, arms, and upper back. Feel your glutes and hamstrings fire up as you lift your hips. Be mindful to keep your knees and toes pointing straight ahead.
- To intensify the stretch in your shoulders, bring your hands underneath you and interlace the fingers.
- Hold your Bridge pose for several breaths, then gently release your hands (if clasped beneath you) and your hips back to your starting position.
23. Happy Baby (Ananda Balasana)
Happy Baby is wonderful for relieving tension in the hips and the lower back. You will feel a deep stretch in your groin, hamstrings, and inner thighs.
It is one of many yoga poses that help to alleviate back pain and ease anxiety and is said to help release negative emotions that are held in the hips.
How to do it:
- Begin by lying on your back. Draw both knees in towards your chest. Flex your feet, so the soles of your feet are facing the sky.
- Take hold of your big toes, ankles, or inner thighs, and draw your knees toward the floor. Aim to keep the natural curves of your spine and draw your tailbone toward the floor.
- Hold for several breaths. Try to soften the front of the hips with each exhalation. Exit the pose slowly, extending both legs back down to your mat.
24. Child’s Pose (Balasana)
The child’s pose is one of the most important yoga postures for beginning students. A yoga instructor will often suggest using it as a resting pose if you need a break during an intense class. Balasana is a grounding posture that provides a gentle stretch for the back and hips. It helps calm the nervous system, reduces stress and fatigue, and relieves lower back pain.
How to do it:
- Start in a kneeling position. Bring your big toes together and widen your knees.
- Walk your hands forward, lowering your torso to rest between your thighs. Feel your forehead and your shins connected to the ground below you.
- Sink your hips back towards your heels as your arms extend forward, creating length throughout your back body.
- If you experience any discomfort in your shoulder, try a variation with your arms resting down by your sides instead. Stay in the Child’s pose for as many breaths as you want or need.
Is Yoga Difficult for Beginners?
The beauty of yoga is that it requires very little other than your own body, a yoga mat, and optional yoga props to get you started. While it can be overwhelming to learn all the different yoga poses and their Sanskrit names, don’t worry too much. After practicing a few times, you’ll feel more comfortable in each posture
However, it is important to familiarize yourself with poses that you’re going to practice beforehand. The more familiar you are with the poses, the more ease you will feel when practicing them.
The 20 yoga poses below are beginner-friendly and give you a great place to start. You can also watch online yoga class videos to see how yogis do each movement. Start with the easier poses and ones that feel more comfortable to you, and always be very careful to listen to your body while practicing.
Never push past your limit. Yoga is about becoming aware of your body. If you are not flexible enough to touch your toes yet, that is okay! Work your way up to it, but never force it.
How Can I Start Yoga at Home as a Beginner?
One of my favorite things about yoga is that I can practice it anywhere— indoors at home or outside in the sun.
If the thought of doing yoga at home sounds ideal to you, then you absolutely can! You can practice yoga in the comfort of your own home.
While yoga sessions led by yoga teachers come with their own merit, there is no need to be in a class setting if that is out of your comfort.
For many beginners, practicing yoga at home is a great option; no one will distract you while in a child’s pose.
Or when you need more concentration for a tree pose, the quietness of your own space may be helpful.
There are also tons of free yoga apps and online yoga classes that’ll walk you through each pose. All you need is a yoga mat to get started.