Loosen up those tight hips and release the tension in the lower back with these easy hip-opener yoga poses. These yoga poses and hip stretches will help reverse the damage of sitting all day long.
Between desk jobs and long commutes, many of us spend the majority of the day sitting.
And unfortunately, that’s bad news for our health.
Too much sitting has been linked to serious health problems, like obesity and osteoporosis, among others, but it also is a significant contributor to that nagging lower backache (1).
But it’s not actually your back that’s the issue: it’s your tight hips.
While in a seated position, your hip flexors constantly remain in a flexed position.
Over time, sitting too much will cause these muscles to shorten and shrink, limiting your ability to fully straighten the hip when you’re finally upright again (2).
When your hip flexors are too tight, they pull down and forward on the pelvis, which tilts it forward and compresses the lower back.
It’s a leading formula for constant back pain, hip pain, and sciatica.
Not to mention, stiffness in muscles can also lead to weak and overstretched muscles.
Luckily, releasing tension with some hip-opening yoga poses could help counteract the prolonged hip flexion of sitting down for long periods of time.
Not only that, yoga hip openers are important in maintaining flexibility and range of motion in your hips.
If you work at a desk job, there are several important areas of the body you can focus on in order to prevent pain from sitting too long.
Below, we’ll take you through several key muscle groups to know about, as well as a short yoga routine that targets these muscles.
Performing these specific yoga exercises will keep your body healthy and help to maintain and even improve flexibility and mobility, making your workouts (and even your everyday life) easier.
You’ll also like:
3+ Exercises That’ll Stretch and Elongate Your Spine After Sitting All Day: No More Back Pain
Key Muscle Groups to Stretch and Strengthen

Hips
As you’re sitting in your chair, the angle between your torso and your thigh is shortened. This causes the muscles in the front of your hips to shorten.
Over a long period of time sitting day after day, your hip flexors will begin to tighten in this position.
This can cause numerous issues, including lower back pain.
Releasing the hips and doing some hip flexor stretches can help prevent this.
If you need some great beginner-friendly yoga sequences targeted at the hips, try these yoga poses.
Low Back
Unfortunately, many of us are losing good posture, and this does no good for our lower backs.
Whether on the couch, in the car, or at work, too much “slouching” puts tons of excess stress on the lower back and the vertebrae.
As you sit throughout the day, focus on sitting up tall, with a straight spine, and keeping your shoulders drawn back.
Glutes & Hip Extensors
Because you are sitting on your keister all day, it only makes sense that those muscles will be stretched out and will weaken over time.
Particularly the hip extensors, which meet at the base of the glutes and the top of the hamstrings.
Hip extensors are just the opposite of the flexors, so strengthening them will help to improve the muscle imbalances developed with prolonged sitting.
If you have ever experienced sciatic pain, you know it can affect many areas of the body, from the back all the way down to your feet.
In many cases, the piriformis muscle may be at the root of the issue.
Although rather small in size, this does muscle an important job of stabilizing the hip joint, along with the glute medius.
The piriformis connects the lower spine to the femur and passes over the sciatic nerve.
When the muscle becomes tight, it can compress the sciatic nerve and cause a lot of pain.
So, it is important to keep your glutes both strong and supple if you want to prevent significant pain issues.
Abdominals
To help prevent stress on the lower back, it’s important to strengthen the abdominals to help you maintain good posture throughout the day and prevent “slouching.”
These plank variations will help improve core strength, and adding in these stability ball exercises will really target those core muscles.
9 Yoga Poses to Do To Undo the Damage of Sitting Down
If you experience pain issues after sitting down for long periods of time, here is a short yoga routine you can try out.
Practice these hip opener yoga poses for just a few minutes a day to help keep your hip muscles relaxed, prevent tightness, maintain flexibility, and achieve a full range of motion in your hips.
1. Child’s Pose (Balasana)
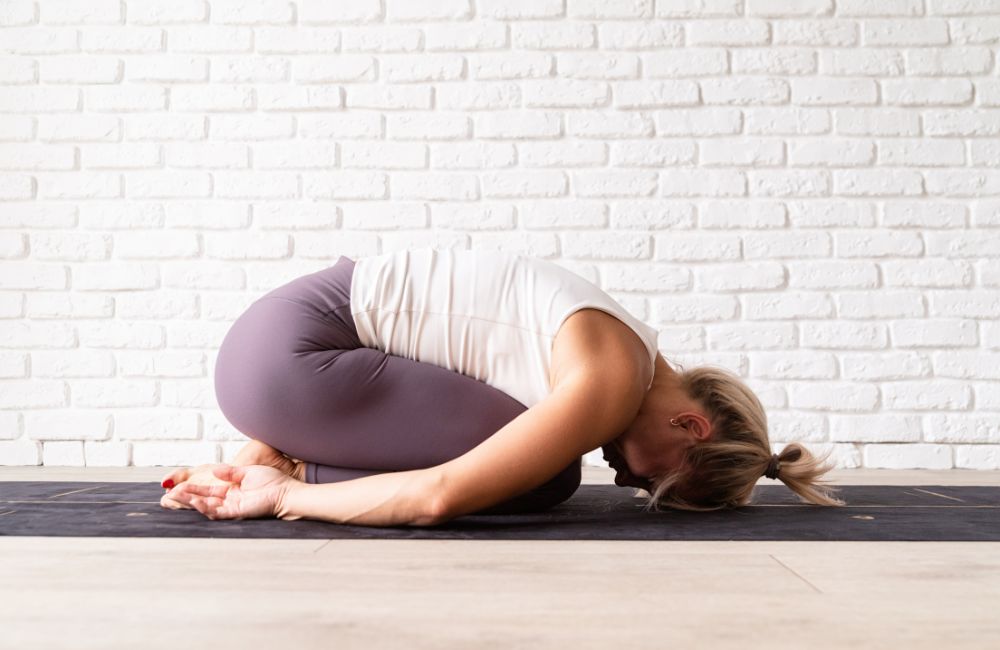
The child’s pose is a gentle and easy pose to bring some relief to tight hips, glutes, and lower back.
As your tailbone reaches back and your arms reach forward, this posture lengthens the entire spine and counteracts the compression developed from sitting for long periods of time, especially in the lumbar spine.
- Begin in a kneeling position, with your big toes together and your knees separated.
- Sitting on your heels, extend your arms forward, bringing your forehead towards the floor.
- Keep reaching your hips back toward your heels as the crown of your head reaches forward.
- Stay in Child’s Pose for several slow, deep breaths. Try to release tension in your back body each time you exhale.
2. Low Lunge (Anjaneyasana)

For reversing the damage of a sedentary lifestyle, Low Lunge is an incredibly effective exercise.
This asana targets many of the muscle groups associated with optimum posture.
It stretches the hip of the back leg, as well as the psoas. Simultaneously, it strengthens the hip extensors, glutes, quads, and hamstrings.
Your lower body will thank you for practicing Low Lunge!
- Begin in Downward Facing Dog (Adho Mukha Svanasana) *ADD INTERNAL LINK HERE? to Down Dog
- Step your right foot forward and plant your foot between your hands.
- Gently place your left knee on the ground and untuck your toes, placing the top of your left foot on your mat.
- Square off your hips, drawing your left hip forward and right hip back.
- Inhale and lift your torso, reaching your arms overhead.
- To feel more of a stretch in your left hip flexor, keep your tailbone tucked, rather than letting your pelvis sink down toward the floor. This will also lengthen rather than compress the lumbar spine.
- Hold your Low Lunge for a few breaths. When ready to exit the pose, return your hands to your mat and step your right foot back to Downward Dog. Repeat a low lunge with your left foot forward.
3. Lizard Pose (Utthan Pristhasana)
After a full day of sitting, your lower body will likely be feeling pretty tight, and you might even experience leg pain.
Lizard pose is the answer! This deep lunge releases tension in your hips and stretches your hamstrings.
Practicing Lizard Pose can also improve your range of motion and hip flexibility.
Reducing stiffness in your legs and hips is a great way to prevent lower back injury.
- Begin in Downward Dog (Adho Mukha Svanasana)
- Step your right foot forward along the outer edge of your yoga mat, to the outside of your right hand.
- Lower your back knee down gently, and place the top of the foot on the floor.
- As you exhale, let your pelvis sink down toward the floor. If possible, come down onto your elbows, placing your forearms on the floor.
- Stay in Lizard Pose for a few slow, deep breaths, releasing a little more tension with each exhale.
- To exit the pose, plant your palms on your mat and step your right foot back to Downward Dog. Repeat Lizard Pose on your left side, stepping the other foot forward.
4. Half Pigeon Pose (Eka Pada Rajakapotasana)
When too much-sitting results in back pain, the gluteal muscles are an important area to focus on.
Half Pigeon offers a deep release for your hips and glutes that can also help alleviate back and leg pain from sciatica.
All variations of Pigeon effectively lengthen the piriformis muscle, which can aggravate the sciatic nerve when it becomes too tense.
In addition to a deep piriformis stretch, Half Pigeon can also help relieve pain issues resulting from hip bursitis, as it stretches the outer hip.
- Begin in a tabletop position on your hands and knees. Bring the right leg forward. Rotate your lower leg so that your right knee comes toward your right wrist, your right ankle behind your left wrist.
- Gently place the right lower leg on the mat. If your hips are already open, your right shin may be parallel to the shorter edge of your mat, with your foot just behind your left wrist. If your hip joint is tighter, your shin may be more at an angle, with your front ankle placed somewhere in front of your left hip and behind your left wrist.
- Be mindful of any feelings of discomfort in your right knee here. If you have any pain issues in your knee, try the Reclined Pigeon version of this pose. *ADD INTERNAL LINK HERE??? Reclined pigeon pose
- Keep the left leg extending back, with the top of the foot on your mat.
- Place your hands on either side of your legs and come up onto your fingertips. As you inhale, lengthen the spine and reach the crown of your head up towards the sky.
- On your exhale, walk your hands forward, bringing your forearms to the floor. Drop your forehead towards the floor and relax the back of your neck.
- After several slow breaths, bring your hands to your mat in front of your front shin. Straighten your arms, lift your torso, and press yourself back into a tabletop position. Repeat Pigeon Pose on your left side.
5. Tree Pose (Vrksasana)
The tree Pose might seem like an easy pose for beginners. However, this balancing posture has more going on than you might think!
On the standing leg, Tree Pose strengthens the deep stabilizing muscles and tendons of the hip area.
It lengthens the groin and thigh while strengthening the buttocks on the side of the lifted leg.
Practicing Tree Pose will help you gain a greater range of motion in your hip joint. After sitting for a long time, standing poses will help return circulation to your lower extremities.
- Begin in Mountain Pose (Tadasana). Feel the soles of your feet grounded down on the floor.
- Shift your weight slightly into your left foot. Lift your right leg and bring the sole of your foot to the inside of your left thigh.
- Rotate your right femur bone in the hip joint, so the right knee is angled out to the side.
- As you balance on the left leg, use your core muscles to keep your upper body stable. Keep your breath steady, and focus your gaze on an unmoving point in front of you.
- After holding Tree Pose for a few breaths, release your right leg back down and return to Mountain Pose. Repeat on the other side, lifting the left leg.
6. Yogi Squat (Malasana)
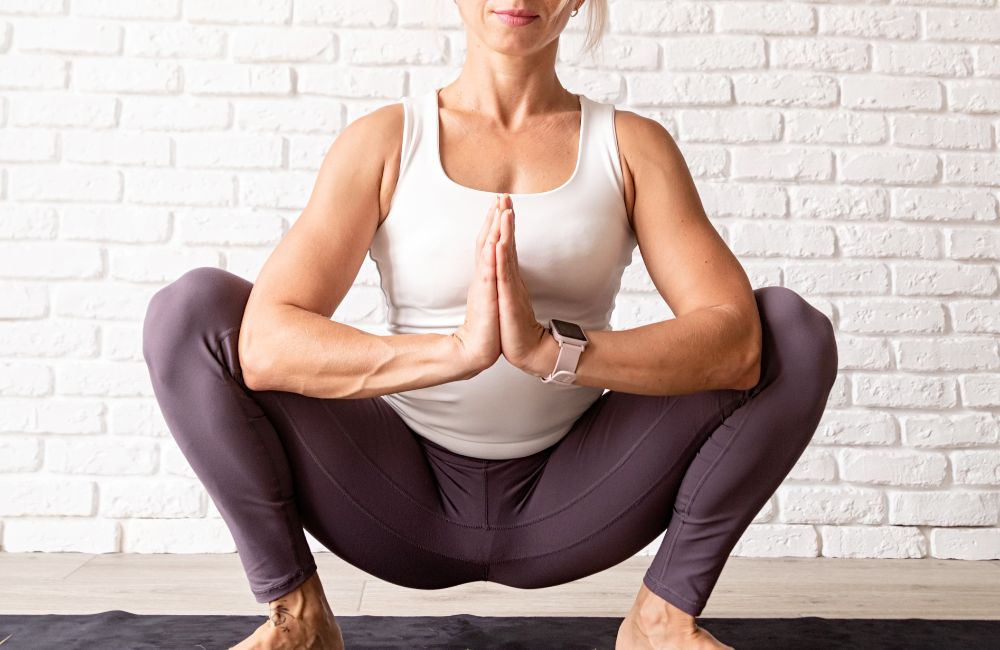
Dropping down into a Yogi Squat after sitting for a long time is one of the best things you can do for your body.
Malasana opens up your hips and inner thighs and offers a nice stretch in the ankles, lower hamstrings, and spine.
Relieving tension in the muscles around the hip joint will also help alleviate stiffness in the lumbar spine.
- Stand at the top of your yoga mat, with your feet placed at the outer edges of the mat.
- Angle your feet slightly, heels in and toes pointing out at about a 45-degree angle.
- Bring your palms together in a prayer position at the center of your chest and come into a deep squat, letting your tailbone sink down toward the floor.
- Create length in the spine by reaching the sitting bones down toward the floor and reaching the crown of the head skyward.
- Press your elbows outward as your inner thighs hug your upper arm bones. With this resistance, lift your chest and grow tall through the crown of your head.
- If it is difficult to keep your upper body lifted due to tightness in the hip joint, try placing a yoga block under your sitting bones for a little extra support.
- To exit Yogi Squat, you can gently lower yourself down and come to a seated position on your yoga mat.
7. Boat Pose (Navasana)
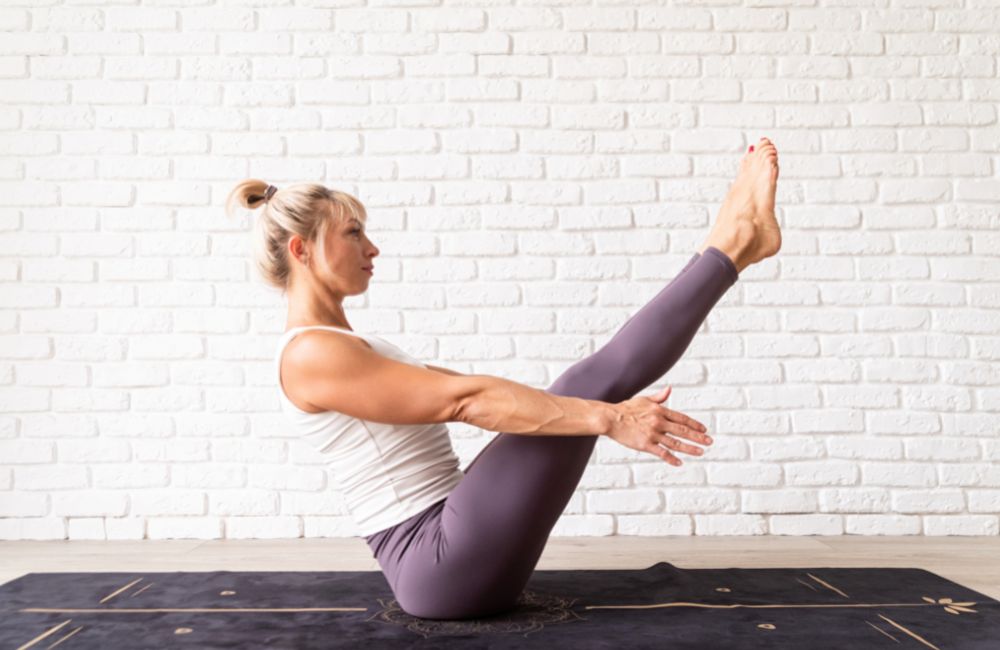
When dealing with pain issues in the hips or lower back, building strength is just as important as releasing tension!
Boat Pose strengthens the hip flexors, the muscles responsible for much movement of your lower body.
You’ll also tone your core and strengthen your spine in Navasana, to support better back posture.
- Begin in a seated position, with your knees bent and the soles of your feet placed on the mat in front of you.
- Bring your hands behind your thighs and sit up tall. Engage your core muscles by scooping your low belly button in and up.
- Rock forward slightly to balance your sitting bones. Lift your right foot, and then the left, bringing your shins parallel to the floor.
- For a challenge, try straightening your legs. Just be sure you don’t rock back onto your tailbone and round your lumbar spine. Keep those sitting bones grounded in your yoga mat!
- Hold in Navasana for a few breaths. When you are ready, release and gently lower both feet back down to your mat.
8. Bound Angle (Baddha Konasana)
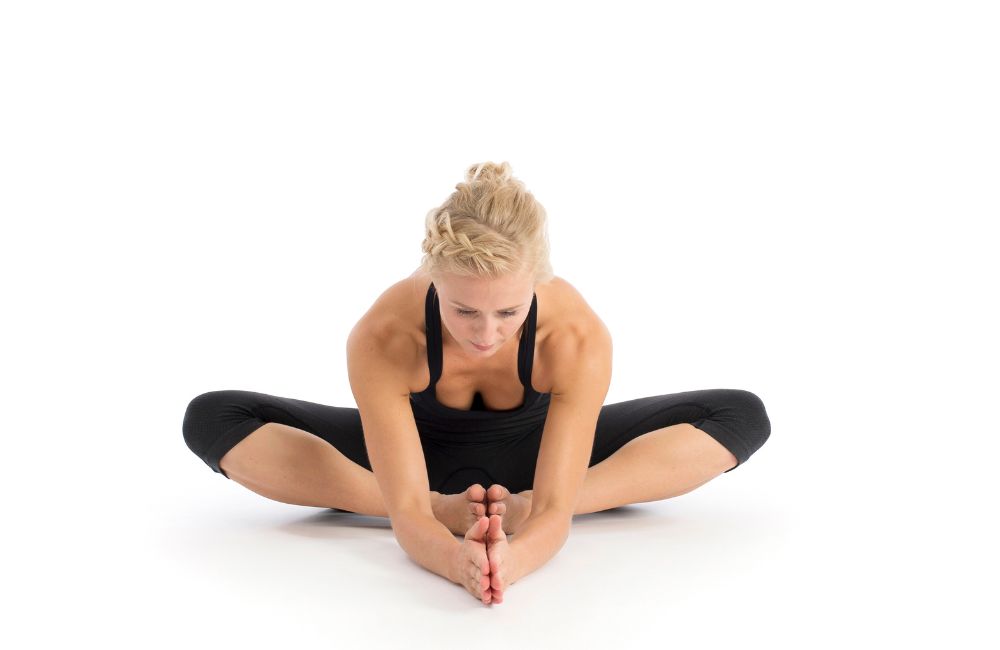
Also known as Butterfly, Baddha Konasana is a great way to relieve tension in the hips, especially in the outer hip.
It also lengthens the groin, inner thighs, and adductors.
This hip opener will help release tension in the low back and can offer some relief from sciatica pain.
Strengthen your back and core by staying seated tall as you allow your hips to open up.
- Begin seated on your yoga mat. Bring the soles of your feet and let your knees fall open.
- Take ahold of your ankles and sit up tall. Feel your sitting bones grounded on the floor and reach the crown of your head towards the sky.
- Use your core muscles and the muscles of the back to keep your spine straight and long, and avoid rounding the lumbar spine.
- If you have super tight hips, try placing a yoga block under each knee for some extra support.
- If holding Bound Angle for a long time in a deeper stretch, you might want to sit on a folded blanket for a little extra cushion.
- When you are ready, release your butterfly by extending both legs in front of you.
9. Happy Baby (Ananda Balasana)
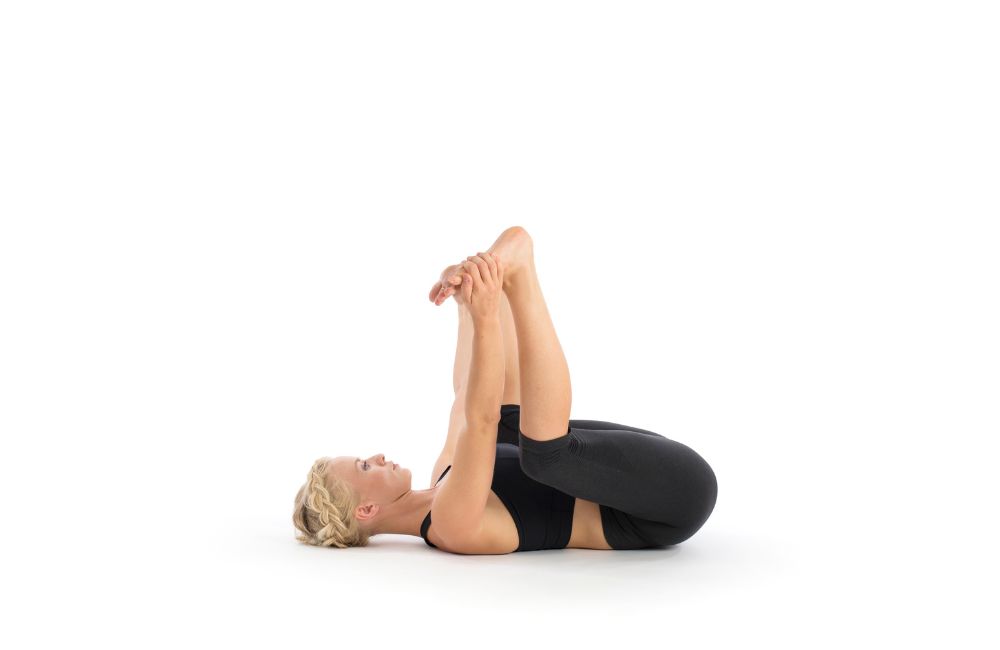
Ananada Balasana is one of the classic go-to hip-opening yoga postures in a typical yoga class.
It relieves lower back pain while opening the hips, inner thighs, hamstrings, and groin.
If you spend a lot of time sitting, this pose will help decompress your SI joint, where the base of the spine meets the hip bones.
This will improve your range of motion and reduce stiffness.
- Begin lying on your back on your yoga mat. Bring your legs up with your knees separated.
- Bend your knees, taking the soles of the feet towards the sky. Your ankles should be over your knees, with your shins perpindicular to the floor.
- Depending on your flexibility, you can take ahold of the big toes, ankles, calves, or place your hands behind your thighs.
- Spread your femur bones so your knees are angled slightly outward and gently pull down, drawing your knees toward the floor.
- Stay in Happy Baby for several slow, deep breaths. Try holding for 2 minutes so really release all the way into your deep connective tissue. Then, gently release your legs back down, extending them along your yoga mat.
Takeaway
Of course, the best way to prevent chronic hip pain and back pain is to keep your body moving and avoid sitting for too long.
Unfortunately, that might be easier said than done given the busy work schedules that keep us seated at a desk.
But, with a little knowledge and specific yoga exercises, you can keep your muscles, ligaments, and joints feeling good.
If you have a tough time with tight hips, we hope you find this hip-opening yoga poses helpful.
References
- Laskowski, M.D., Edward R. “Sitting Risks: How Harmful Is Too Much Sitting?” Mayo Clinic, Mayo Foundation for Medical Education and Research, 21 Aug. 2020, www.mayoclinic.org/healthy-lifestyle/adult-health/expert-answers/sitting/faq-20058005.
- Avrahami, Daniel, and Jim R Potvin. “The Clinical and Biomechanical Effects of Fascial-Muscular Lengthening Therapy on Tight Hip Flexor Patients with and without Low Back Pain.” The Journal of the Canadian Chiropractic Association, Canadian Chiropractic Association, Dec. 2014, www.ncbi.nlm.nih.gov/pmc/articles/PMC4262809/.